
Xhorse Condor XC-Mini Plus II key cutting machine is a reliable and efficient tool for locksmiths, allowing them to cut keys with precision. However, some users have reported encountering an error message stating “Error Code: 5” when attempting to use the machine. In this blog post, we will explore the possible cause of this issue and provide a step-by-step solution to resolve it.
Issue Description:
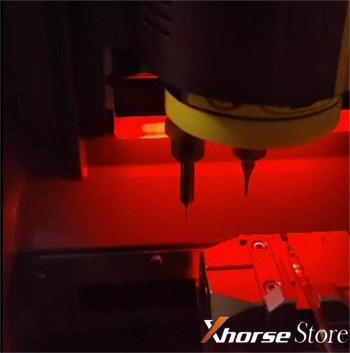
Several customers have reported experiencing difficulties with the probe not going inside the axis on their Condor XC MINI Plus II key cutting machines.
This issue triggers the message:
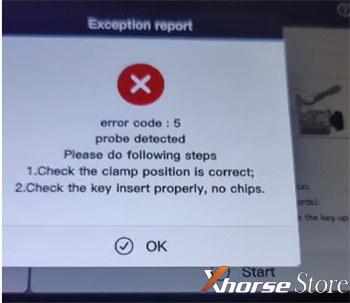
“Error Code: 5.
Probe Detected.
Please do following steps:
- Check the clamp position is correct;
- Check the key insert properly, no chips.”
And preventing customers from proceeding with key cutting operations.
Possible Cause:
After careful analysis, it has been determined that the misalignment between the milling cutter and the probe’s height is the likely cause of this issue. When the two components are not properly aligned, the machine’s sensor detects an obstruction, leading to the error message.
Solution Steps:
Fortunately, there is a simple solution to fix this issue. By following these steps, users can realign the milling cutter and the probe, ensuring smooth operation of the key cutting machine.
Step 1: Access the axis:
1.1. Locate the screw that secures the milling cutter in place.
1.2. Carefully unscrew the mill cutter, allowing it to be removed from the axis.

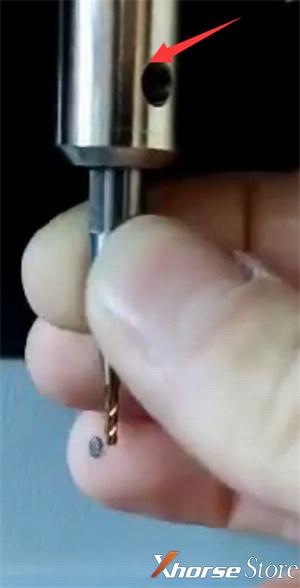
Step 2: Prepare the sandpaper:
2.1. Take a piece of sandpaper and roll it into a small cylinder shape.
2.2. Ensure that the sandpaper is of fine grit to avoid damaging the axis.
Step 3: Polish the axis:
3.1. Insert the rolled sandpaper into the axis where the milling cutter was removed.
3.2. Rotate the sandpaper in a circular motion to polish the inner surface of the axis.
3.3. Continue this process until the axis feels smooth and even.
Step 4: Reinstall the milling cutter:
4.1. Remove the sandpaper from the axis.
4.2. Place the milling cutter back into the axis, aligning it properly.
4.3. Tighten the screw to secure the milling cutter in place.
Step 5: Test the machine:
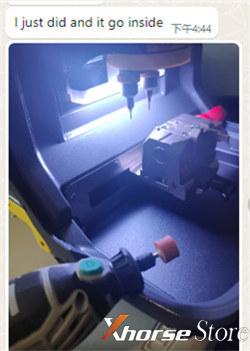
5.1. Turn on the Condor XC MINI Plus II key cutting machine.
5.2. Verify that the probe now smoothly goes inside the axis without triggering the error message.
5.3. Test the machine by cutting a sample key to ensure proper functionality.
Customer Feedback:
Customers who have encountered the “Error Code 5: Probe Detected” issue and followed the steps mentioned above have reported successful resolution of the problem. By polishing the axis and ensuring alignment between the milling cutter and the probe, the machine operates smoothly, allowing for accurate key cutting.
Conclusion:
If you encounter the “Error Code 5: Probe Detected” message on your Condor XC MINI Plus II key cutting machine, there’s no need to panic. By following the simple solution outlined in this blog post, you can resolve the issue and get back to cutting keys efficiently. Remember to exercise caution when working with the machine’s components and use fine-grit sandpaper to avoid any damage. We hope this troubleshooting guide helps you overcome the probe detection error and ensures a seamless key cutting experience.